eNB Installation
This section describes how to install and configure the Sercomm eNB which is the default eNB device in Aether.
Preliminaries
Prepare the following devices:
Sercomm eNB
GPS Antenna
10GbE SFP+ to 1/10GbE copper media converter
PoE+ Injector
Workstation to remotely access and configure the eNB
Collect the following information:
eNB IP address
MME IP address (10.168.0.6 by default for Aether Central)
TAC
Cell ID
Warning
Cell ID and TAC are critical parameters that need to be globally unique.
Please get the assigned value from OPs team.
Connect the eNB
The Sercomm eNB has two Ethernet ports (WAN and LAN), one power port,
and one GPS port. The WAN port support Power over Ethernet (PoE+).
Connect a GPS Antenna to the eNB and place is in a location where it has visibility to the open sky, such as a window or skylight.
Connect the eNB to the fabric switch through a media converter and PoE+
Injector to the WAN port of the eNB, then it will automatically get
pre-configured IP address using DHCP.
Verify that you can access the web-based configuration(https://<eNB IP>)
from your workstation. If the eNB address is not directly reachable, use the
management router as a jump host - this can be done using ssh:
ssh user@[ management-router ] -L 8443:<eNB IP>:443
then visiting https://localhost:8443
The default credentials for the Sercomm eNB are:
Username:
sc_femtoPassword:
scHt3pp(may also besc_femto)
Upgrade Firmware
Download the latest firmware to your workstation.
From the eNB configuration page, go to Manage > Firmware Management, click Choose File button, select the downloaded firmware, and click Upload button. Reboot the eNB if it does not automatically.
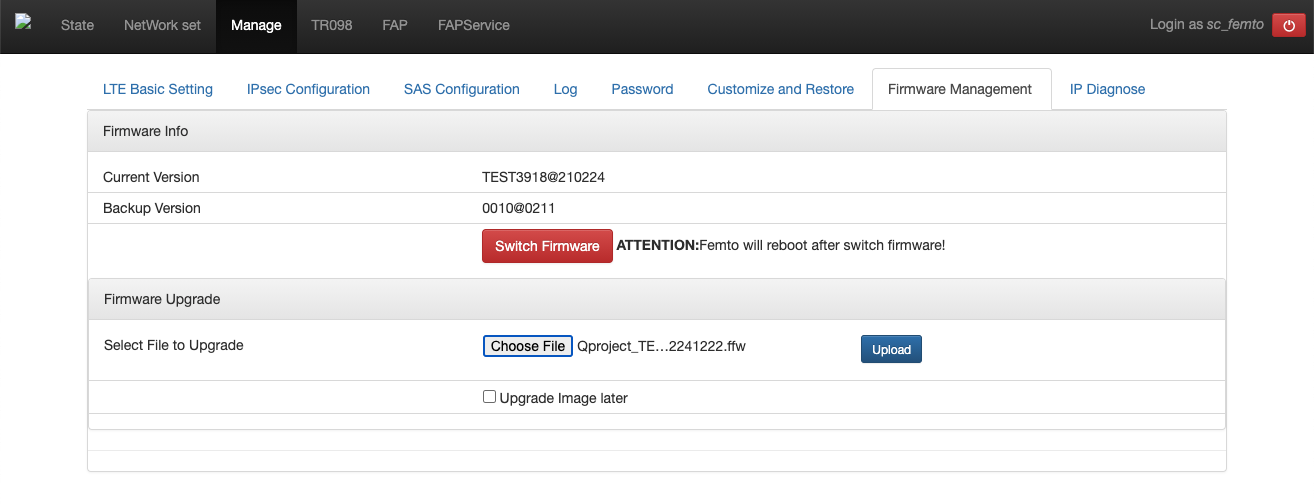
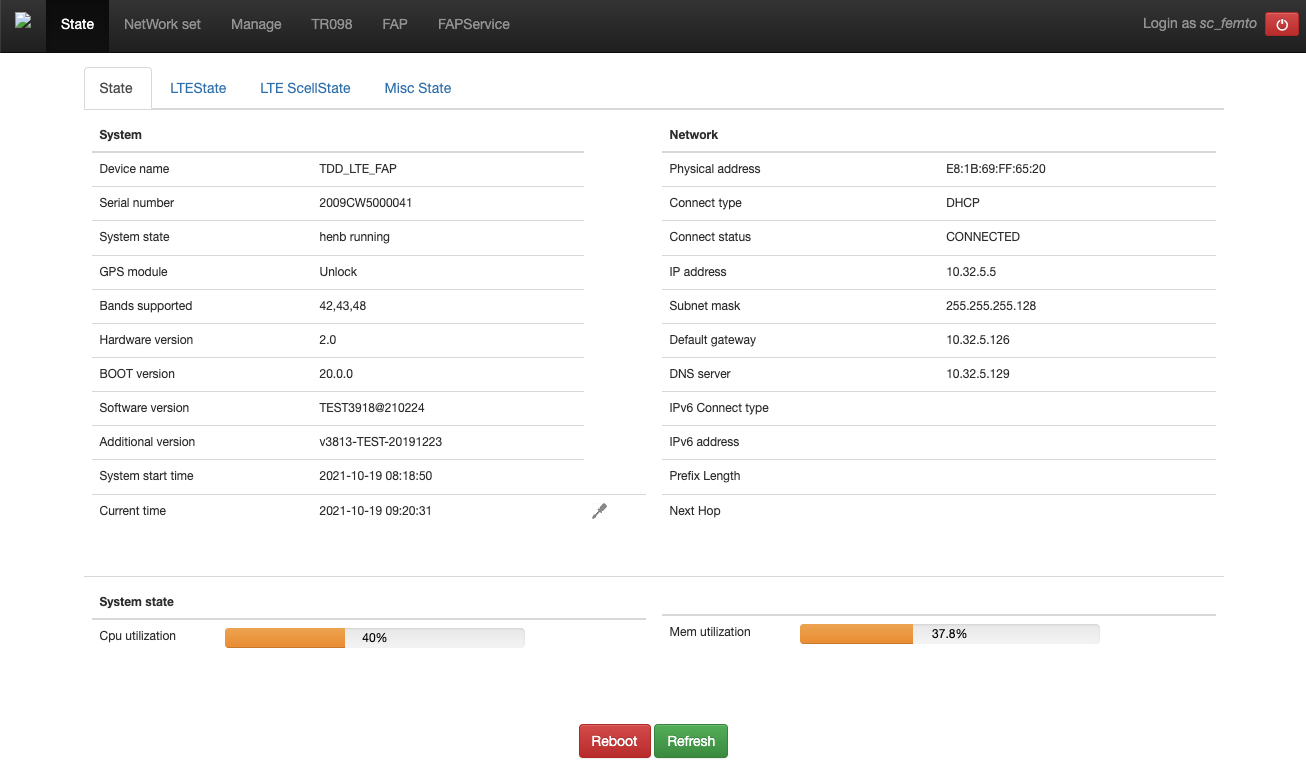
After the reboot, confirm the Software version from the State > State menu.
LTE configuration
Go to Manage > LTE Basic Settings tab and change the parameters as shown below.
Click Save at the bottom after making the changes.
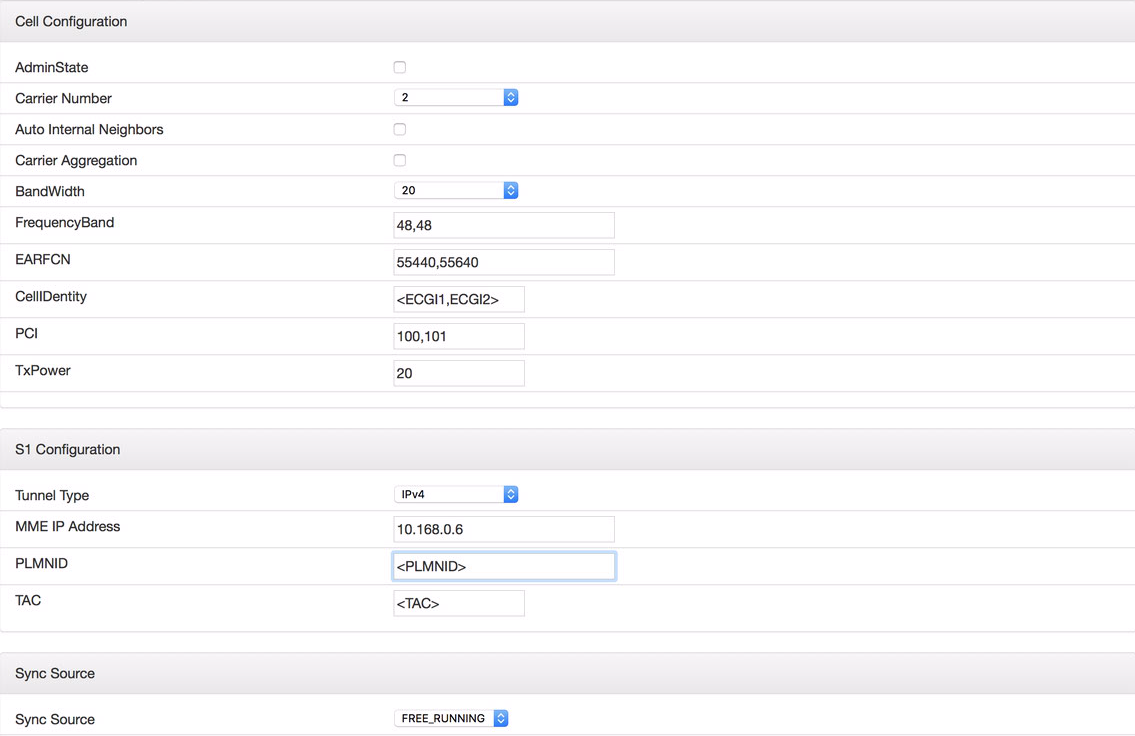
Carrier Number:
2Carrier Aggregation:
uncheckedBandWidth:
20FrequencyBand:
48,48EARFCN:
55440,55640CellIdentity:
assigned Cell IDPCI:
100,101TxPower:
20Tunnel Type:
IPv4MME IP Address:
10.168.0.6TAC:
assigned TACPLMNID:
315010Sync Source:
FREE_RUNNINGEnable CWMP:
unchecked
Note
E-UTRAN Cell Global Identifier (ECGI) should be used for the CellIdentity field
Other Settings
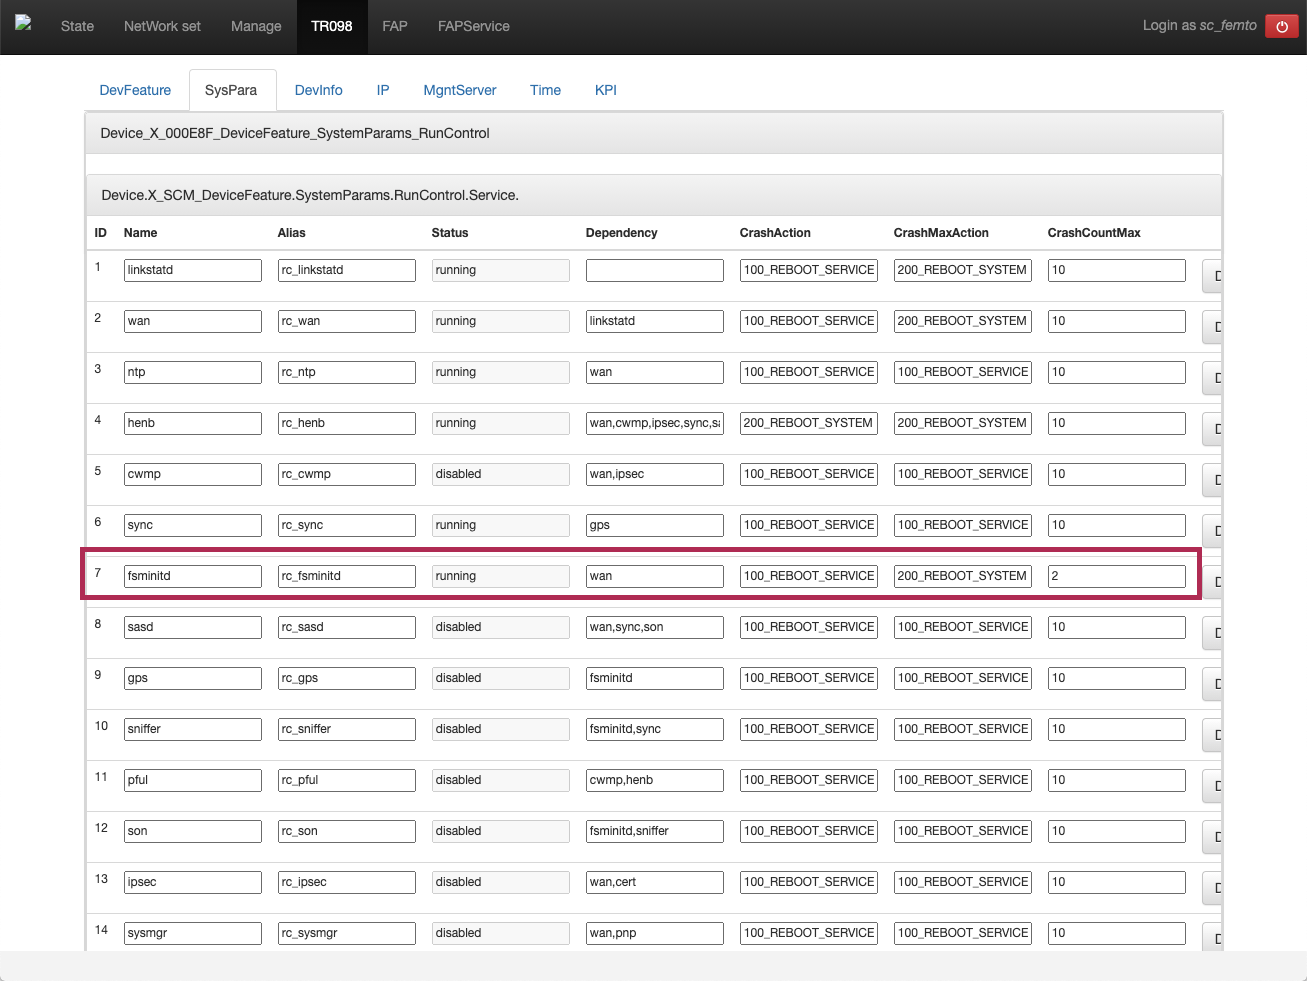
Go to TR098 > SysPara tab and set fsminitd parameter setting to 2.
Click Modify button right next to the parameter value, and Save button at the bottom.
Connect the Sercomm eNB to the Google SAS
Configure the SAS parameters by going to the Manage > SAS Configuration tab. Configure the following parameters:
Enable: checked
Server URL:
https://sas.goog/v1.2/UserContactInformation:
aetherFCCID:
P27-SCE4255W(It can be find on the device)Category:
AMeasure Configuration:
RECEIVED_POWER_WITHOUT_GRANT
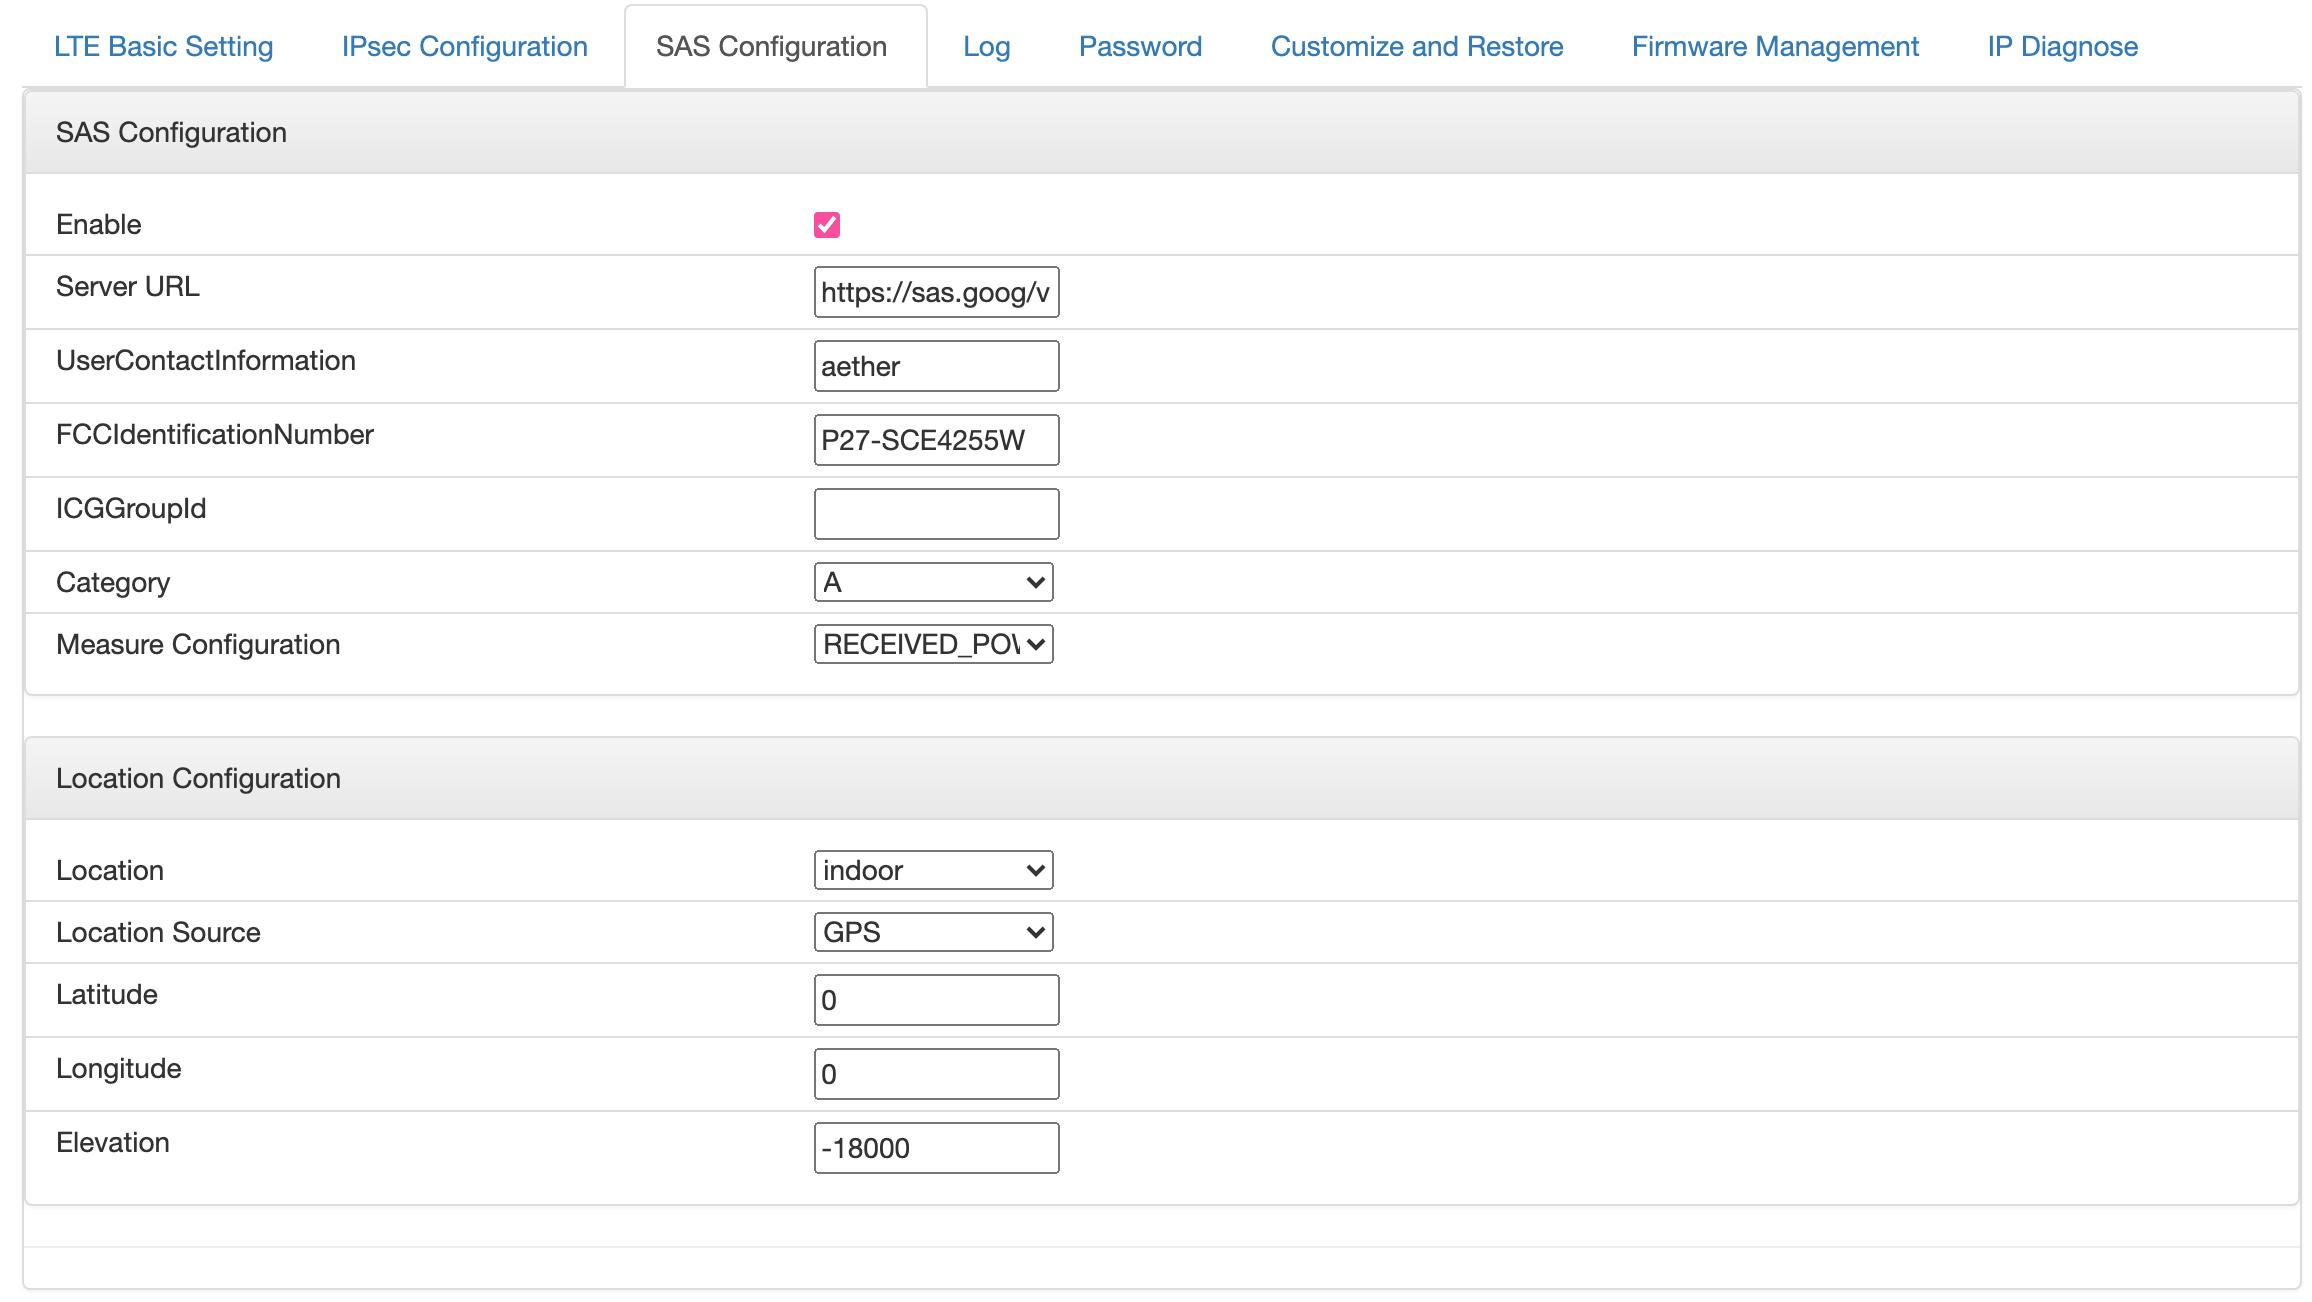
Make a note of the eNB’s GPS coordinates, as they are used later
Note
The Sercomm eNB multiplies the GPS coordinates by 1000000, and the height in meters by 1000 in it’s UI.
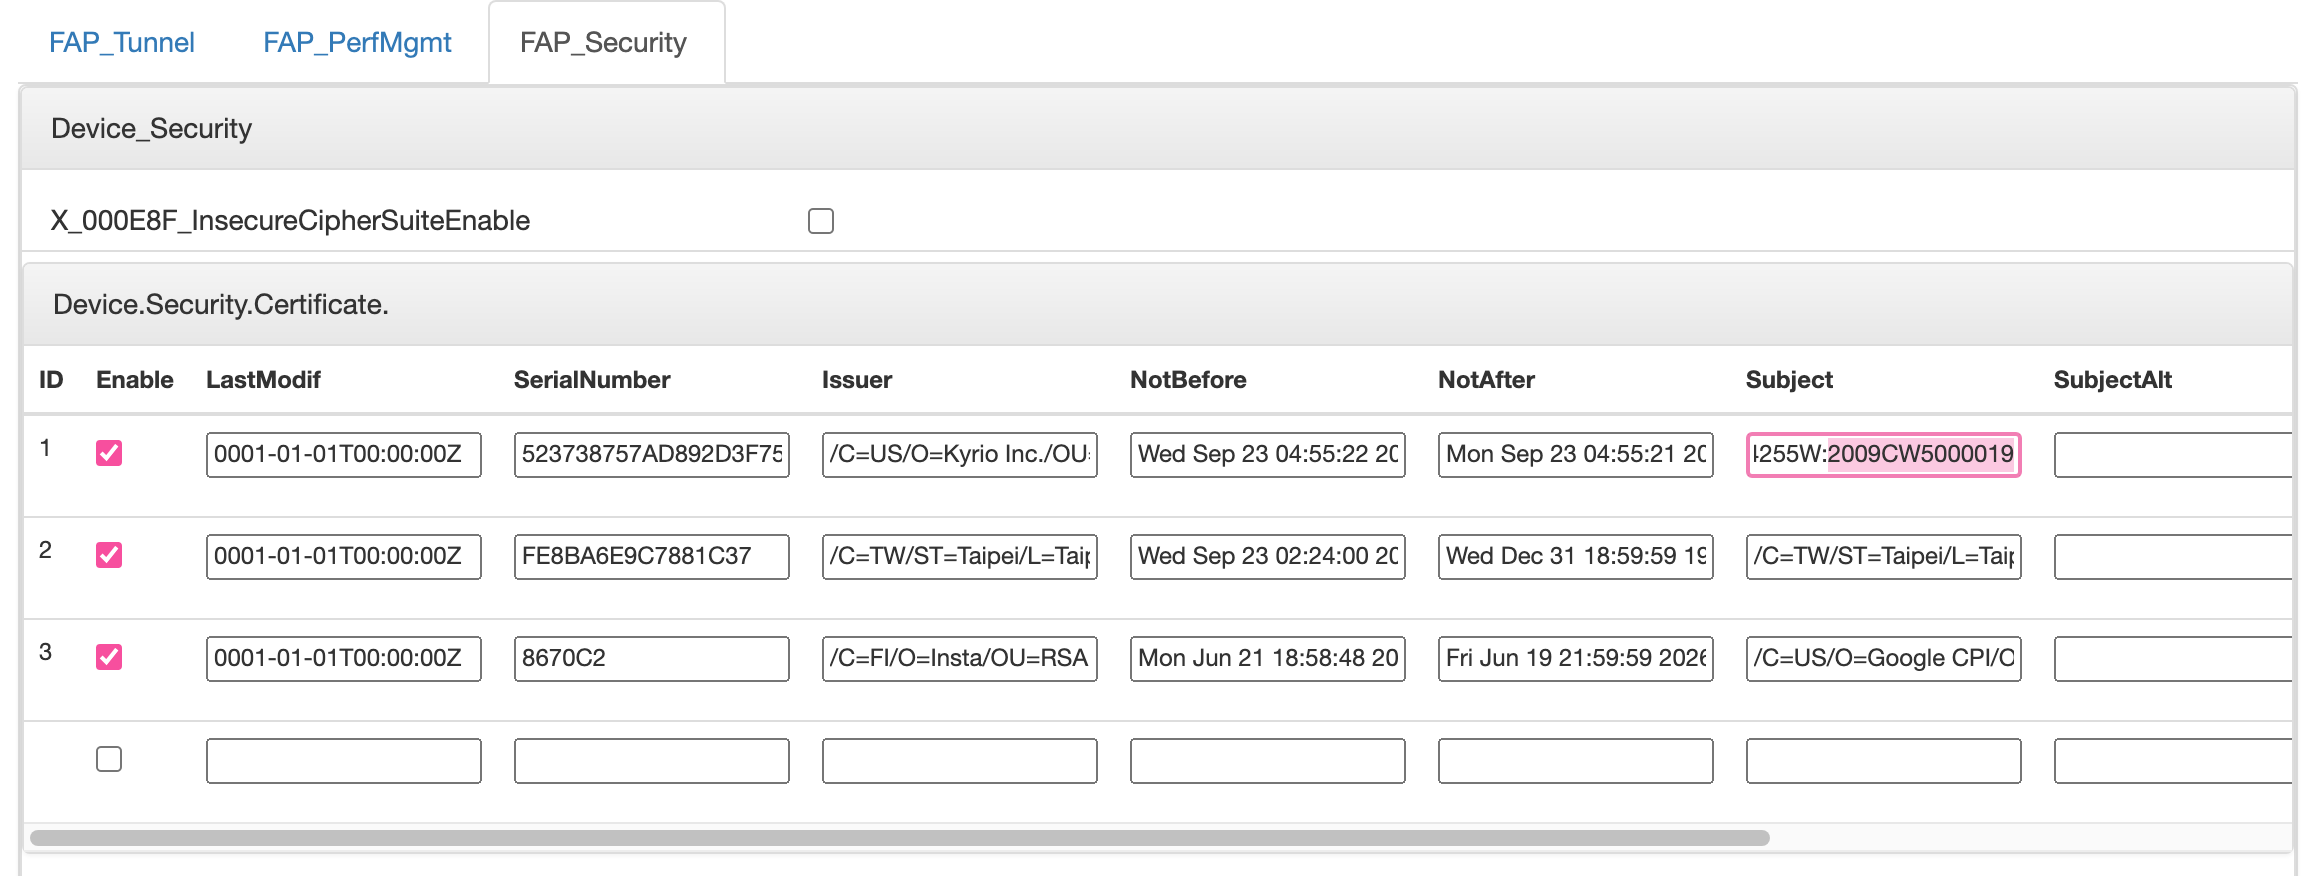
Next, go to the FAP > FAP_Security section. This will list security
certificates installed on the eNB, and will provide both the device Serial
Number and the certificate subject. On the first line copy the Subject
field, which should have content similar to /C=TW/O=Sercomm/OU=WInnForum CBSD
Certificate/CN=P27-SCE4255W:2009CW5000019.
For the SAS to trust the CBSD, it must receive signed CPI data specific to the
device. To create this data, duplicate the example.json as
DEVICE_SERIAL_NUMBER.json, and update the content to match eNB’s settings.
The signing tool cbrstools/cpisign.py script will sign CPI data.
This script requires a CBRS CPI key (.p12 format) and associated password
to be run - an example invocation:
$ python cpisign.py -k YOUR_CPI_KEY.p12 DEVICE_SERIAL_NUMBER.json
It will prompt for your CPI key password when run, and will generate a signed
file in output/ folder, named with the serial number.
Next, go to the FAPService > FAPControl tab , and in the FAPService_FAPControl_LTE section set these fields:
AdminState: checked
In the FAPService_FAPControl_LTE_X_000E8F_SAS section, configure the following information in fields:
CPIEnable: checked
Enable: checked
ManufacturerPrefixEnable: checked
Server: <should have the SAS URL filled in>
CPIId: <CPI_ID_from_certificate>
CPIName: <CPI_name>
HeightType:
AGLCPISignatureData: <generated_output_from_python_script>
Location:
indoorAntennaAzimuth, AntennaDowntilt, AntennaGain, AntennaBeamwidth: same as SERIAL_NUMBER.json
CertSubject:
/C=TW/O=Sercomm/OU=WInnForum CBSD
Certificate/CN=P27-SCE4255W:2009CW50000...
(from previous step)
Then click Save, and go to the power icon at top right and tell the eNB to restart.
Once restarted, check the State > Misc State tab to verify that the device is registered with SAS.
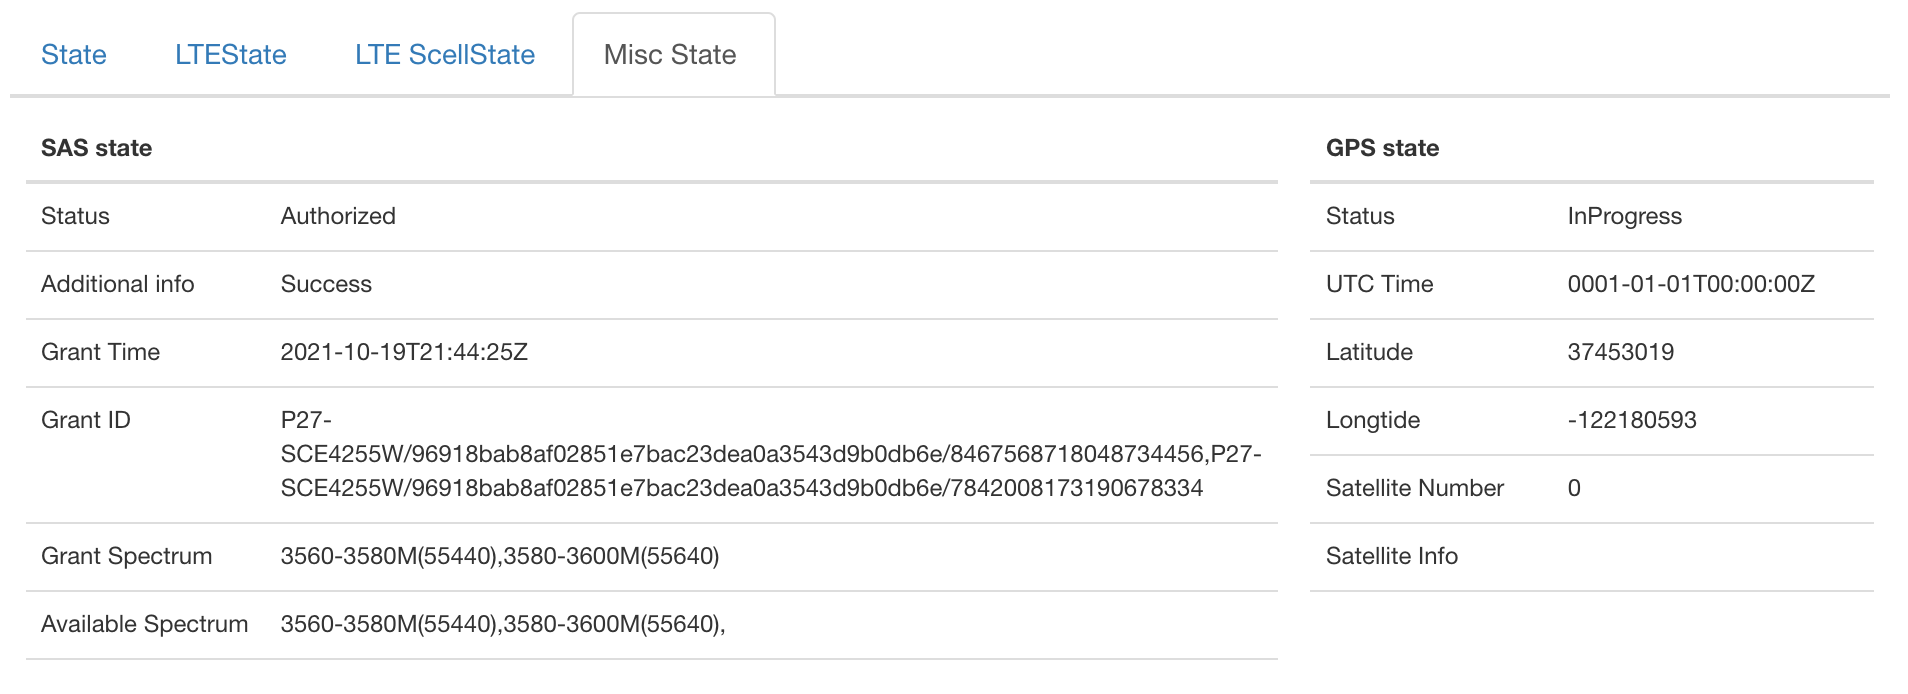
Verify that the eNB is correctly registered on the SAS website.
Troubleshooting
Connectivity check
In order to check the connectivity, we can use the Sercomm eNB admin UI.
Go to Manage > IP Diagnose tab
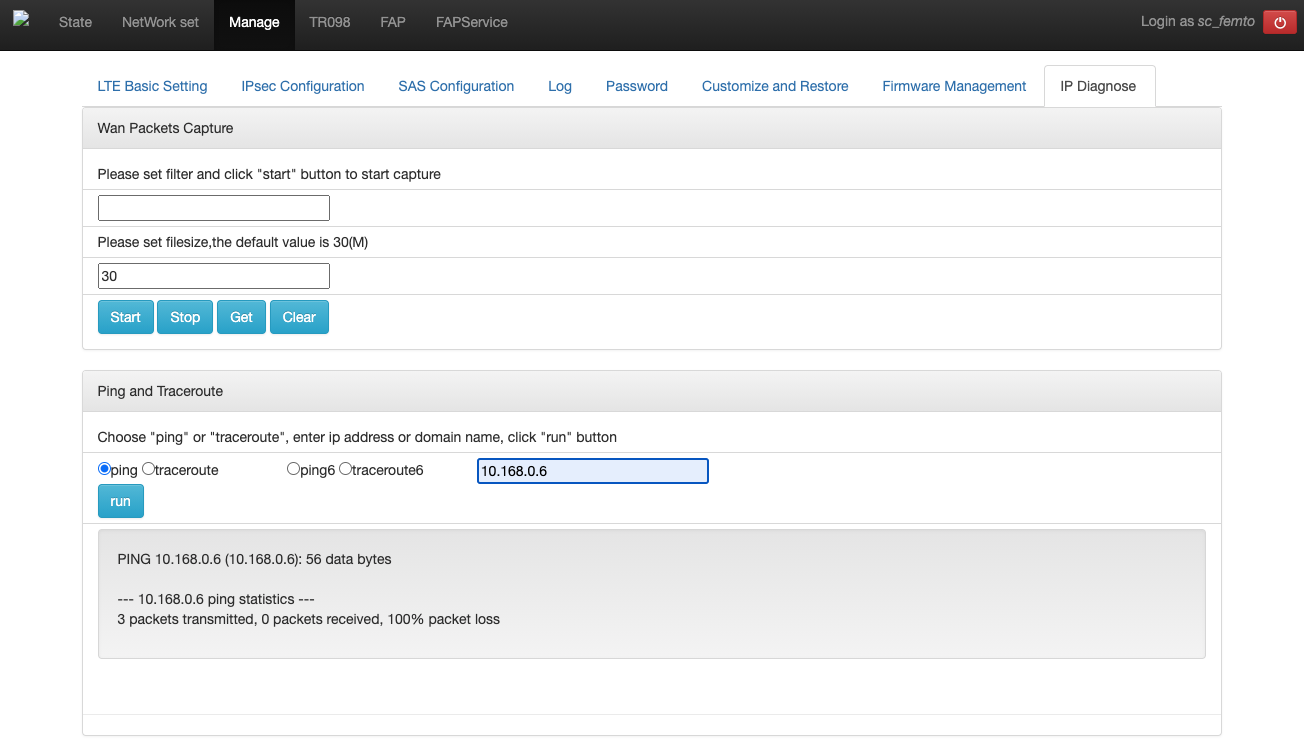
In this page, check the ping menu, put an IP address to test in the text
box, and click Run button.
After a few seconds the ping results will be displayed.
eNB SAS log shows failed state
Usually this is because of a configuration mismatch between the eNB config and CPI signature data. Check in Manage > Log > sas.log and look for information returned by the SAS.
eNB SAS log disappears
When the eNB runs out of space due to log messages, the sas daemon will not
run. Clear the log by clicking ClearLog at the bottom of the log page.
eNB SAS log shows errors
If the sas.log shows a message like failed to open file
/var/conf/sas/cpi.key there is likely something wrong with the configuration.
Check the following:
CPISignatureDatafield - data is larger than the field size, could be entered twice.Check that the location and other data that is signed by the CPI key matches the data in the eNB UI.