Aether-in-a-Box for Developers
Aether-in-a-Box (AiaB) provides an easy way to deploy Aether’s SD-CORE and ROC components, and then run basic tests to validate the installation. This guide describes the steps to set up AiaB.
AiaB can be set up with a 4G or 5G SD-CORE. In either case, SD-CORE configuration can be done with or without the ROC. The ROC provides an interactive GUI for examining and changing the configuration, and is used to manage the production Aether; it can be deployed to test the integration between ROC and SD-CORE. If the ROC is not deployed, a simple tool called SimApp is used to configure the required state in SD-CORE for testing core functionality.
Helm charts are the primary method of installing the SD-CORE and ROC resources. AiaB offers a great deal of flexibility regarding which Helm chart versions to install:
Local definitions of charts (for testing Helm chart changes)
Latest published charts (for deploying a development version of Aether)
Specified versions of charts (for deploying a specific Aether release)
AiaB can be run on a bare metal machine or VM. System prerequisites:
AiaB 4G: Ubuntu 18.04 clean install (18.04 is a requirement of OAISIM which is used to test 4G Aether)
AiaB 5G: Ubuntu 18.04, 20.04, 22.04 1
Kernel 4.15 or later
Haswell CPU or newer
At least 4 CPUs and 12GB RAM
Ability to run “sudo” without a password. Due to this requirement, AiaB is most suited to disposable environments like a VM or a CloudLab machine.
No firewall running on the AiaB host. For example, sudo ufw status should show inactive, and sudo iptables -L and sudo nft list should show a blank configuration.
- 1
AiaB requires to increase the maximum number of available watches and the maximum number of inotify instances in Ubuntu 22.04. Otherwise, there will be a “time out” error due to “Too many files open”. Some users have also reported to see this issue when using Ubuntu 20.04. AiaB fails too many files open provides more details on how to address this issue.
Note
Running both 4G and 5G SD-CORE simultaneously in AiaB is currently not supported.
AiaB changes the host server by adding systemd-networkd configuration files to the host’s network configuration. Systemd-networkd is the default networking configuration tool for Ubuntu, but if your server or VM uses a different method it may not be fully compatible with AiaB.
Ubuntu Environment
AiaB has been tested in the following environments:
Bare metal (on CloudLab Wisconsin cluster, small-lan profile running UBUNTU 18.04 OS image)
AWS VM (official Ubuntu 18.04 image on t2.xlarge instance)
VirtualBox VM running bento/ubuntu-18.04 Vagrant box on Intel Mac
VM created using Multipass on Intel Mac
The Multipass tool by Canonical provides an easy way to create a compatible environment for playing with AiaB on Linux, Mac, or Windows. After installing Multipass on your development machine, you can bring up a VM as follows:
multipass launch 18.04 --cpus 4 --disk 50G --mem 12G --name aiab
multipass shell aiab
sudo apt update
sudo apt install -y make
Proxy Settings (Conditional)
AiaB can also be installed behind a proxy. To do so you will need to set the standard Linux environment variables http_proxy, https_proxy, no_proxy, HTTP_PROXY, HTTPS_PROXY and NO_PROXY appropriately, and i) prepend PROXY_ENABLED=true to the make commands in this document or ii) export PROXY_ENABLED=true as follows:
make {arg} PROXY_ENABLED=true
or:
export PROXY_ENABLED=true
The latter option can be included in the .bashrc file to make it permanent.
Installing the 4G AIAB
Clone 4G AIAB (aether-in-a-box)
To initialize the AiaB environment, first clone the following repository in your home directory:
cd ~
git clone "https://gerrit.opencord.org/aether-in-a-box"
cd ~/aether-in-a-box
Note
Most users install AiaB using published Helm charts (e.g., CHARTS=latest, CHARTS=release-2.0)
If you wish to modify helm charts and want to test AIAB with modified helm charts then check the section - Using Local Helm Charts 4G
Installing the 4G ROC
Note that you must install the ROC before installing SD-CORE. If you are not using the ROC to configure SD-CORE, you can skip this step.
In order to install the ROC using the latest published charts, add CHARTS=latest to the command, e.g.,:
CHARTS=latest make roc-4g-models
To install the Aether 2.0 release, add CHARTS=release-2.0:
CHARTS=release-2.0 make roc-4g-models
The ROC has successfully initialized when you see output like this:
echo "ONOS CLI pod: pod/onos-cli-5b947f8f6-4r5nm"
ONOS CLI pod: pod/onos-cli-5b947f8f6-4r5nm
until kubectl -n aether-roc exec pod/onos-cli-5b947f8f6-4r5nm -- \
    curl -s -f -L -X PATCH "http://aether-roc-api:8181/aether-roc-api" \
    --header 'Content-Type: application/json' \
    --data-raw "$(cat /root/aether-in-a-box//roc-5g-models.json)"; do sleep 5; done
command terminated with exit code 22
command terminated with exit code 22
command terminated with exit code 22
"9513ea10-883d-11ec-84bf-721e388172cd"
Don’t worry if you see a few lines of command terminated with exit code 22; that command is trying to load the ROC models, and the message appears if the ROC isn’t ready yet. However if you see that message more than 10 times then something is probably wrong with the ROC or its models.
Installing the 4G SD-CORE
If you have already installed the 5G SD-CORE, you must skip this step. Only one version of the SD-CORE can be installed at a time.
To install the SD-CORE using the latest published charts, add CHARTS=latest to the command, e.g.,:
CHARTS=latest make test #override value file - `~/aether-in-a-box/sd-core-4g-values.yaml`
To install the Aether 2.0 release, add CHARTS=release-2.0:
CHARTS=release-2.0 make test #override value file - `~/aether-in-a-box/release-2.0/sd-core-4g-values.yaml`
4G SD-CORE deploys the following core components to provide mobile connectivity:
SPGW (Serving/PDN Gateway): Combined Serving Gateway and Packet Data Network (PDN) Gateway
UPF (User Plane Function): The interconnect between the mobile infrastructure and the Data Network (DN).
PCRF (Policy and Charging Rules Function): Data flow detection, policy enforcement, and flow-based charging.
MME (Mobility Management Entity): Manages UE access network and mobility, and establishing the bearer path for UE.
HSS (Home Subscriber Server): The main subscriber database.
Config4g (Config Pod)
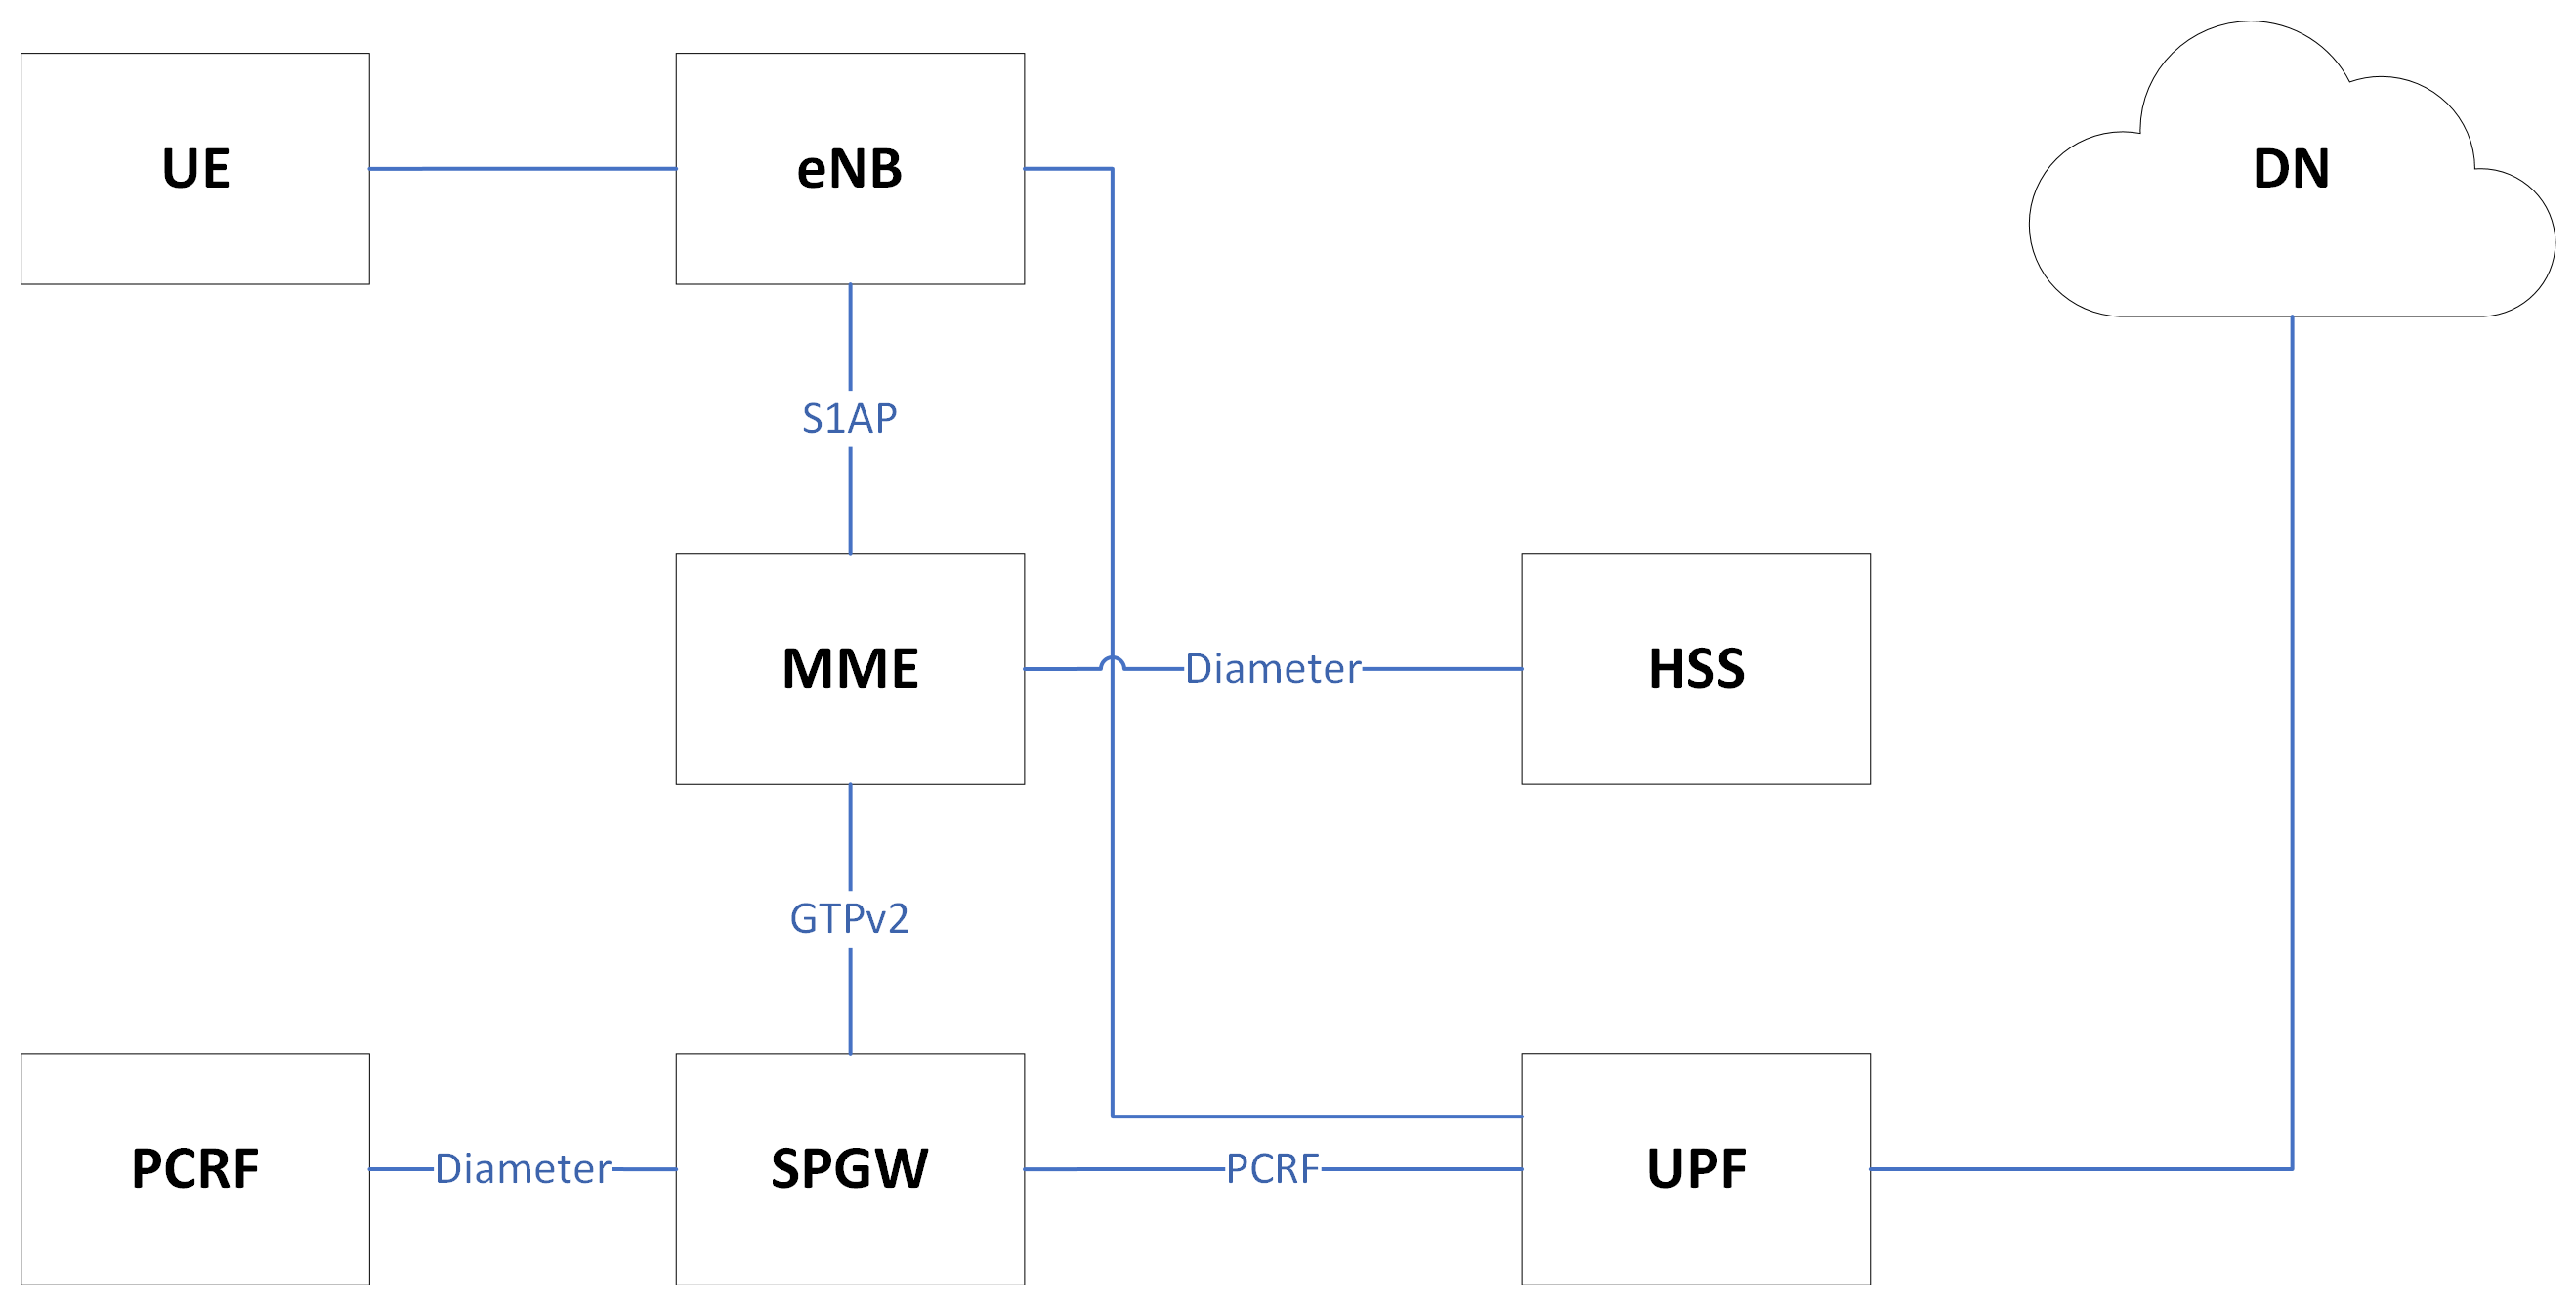
Figure 1. Communication between 4G SD-CORE Components
The eNB (evolved Node B) is the Radio Access Network (RAN) of the 4G architecture and allows the UEs to connect to the Mobile network. It passes UE’s attach request to MME via S1AP interface to be identified and authenticated through HSS. MME sends the session request to SPGW to create the GTP tunnel and request the default bearer. SPGW sends back the UPF address to establish the connectivity (GTP tunnel) to the DN through the user plane.
When the AiaB is up, you can explicitly specify the oip1 interface within the command to send data over the 4G datapath. Examples:
curl --interface oip1 http://ipv4.download.thinkbroadband.com/5MB.zip --output /dev/null
ping -I oip1 google.com
iperf3 -c la.speedtest.clouvider.net -p 5204 -B 172.250.255.254
AiaB deploys a router pod in the “default” namespace with four interfaces: ran-gw for the radio network, access-gw for access network, core-gw for core network, and eth0 for the external network. When a UE starts sending traffics to the data network through the user plane (access network), the uplink (UE to internet) data packets traverse the following path across the pods:
(oip1) enb-0 (enb) ==GTP==> (ran-gw) router (access-gw) ==GTP==> (access) upf-0 (core)
----> (core-gw) router (NAT,eth0)
And the downlink (internet to UE) packets follow as:
(NAT,eth0) router (core-gw) ----> (core) upf-0 (access) ==GTP==> (access-gw) router (ran-gw)
==GTP==> (enb) enb-0 (oip1)
Note
In the above notations, network interfaces within each pod are shown in parenthesis. The IP packets sent/received between the UE and external host via the user plane are GTP-encapsulated and tunneled between the eNB and UPF.
Exploring 4G AIAB
The kubectl tool is the best way to get familiar with the pods and other Kubernetes objects installed by AiaB. The SD-CORE services, UPF, and simulated edge devices run in the omec namespace, while the ROC is running in the aether-roc namespace.
The ROC GUI is available on port 31194 on the host running AiaB.
See the instructions here to deploy a basic monitoring stack to AiaB. This could be useful if you wish to use AiaB as an environment for prototyping Prometheus exporters or Grafana dashboards for Aether.
Cleanup 4G AIAB
The first time you build AiaB, it takes a while because it sets up the Kubernetes cluster. Subsequent builds will be much faster if you follow these steps to clean up the Helm charts without destroying the Kubernetes cluster.
Clean up the 4G SD-CORE: make reset-test
Reset the 4G UE / eNB in order to re-run the 4G test: make reset-ue
Clean up the ROC: make roc-clean
It’s normal for the above commands to take a minute or two to complete.
As an example, suppose that you want to test the 4G SD-CORE with the ROC, and then the 5G SD-CORE with the ROC. You could run these commands:
CHARTS=latest make roc-4g-models   # Install ROC with 4G configuration
CHARTS=latest make test            # Install 4G SD-CORE and run ping test
make reset-test
make roc-clean
CHARTS=latest make roc-5g-models   # Install ROC with 5G configuration
CHARTS=latest make 5g-test         # Install 5G SD-CORE and run gNB Sim test
make reset-5g-test
make roc-clean
To completely remove AiaB by tearing down the Kubernetes cluster, run make clean.
Using Custom 4G Container Images
Suppose you wish to test a new build of a 4G SD-CORE services. You can deploy custom images by editing:
Override file  - `~/aether-in-a-box/sd-core-4g-values.yaml` if you are using latest or local Helm charts
Override file  - `~/aether-in-a-box/release-2.0/sd-core-4g-values.yaml` if you are using release-2.0 charts


#update following content in override values to update image tags
omec-control-plane:
    images:
      repository: "" # default docker hub
        tags:
            mme: omecproject/nucleus:master-a8002eb
        pullPolicy: IfNotPresent
To upgrade a running 4G SD-CORE with the new image, or to deploy the 4G SD-CORE with the image. Use appropriate make commands. Following commands assumes that you are using local helm charts
make reset-test; make test #if you are not using local charts then CHARTS option
Note: You can use locally built image (Clone + Compile Code) or you can refer to omecproject dockerhub project to see available image tags.
Using Local Helm Charts 4G
Note: Most users will install AiaB using published Helm charts (e.g., CHARTS=latest, CHARTS=release-2.0). However, if you need to change the Helm charts themselves, clone these additional repositories to work with the local Helm charts:
mkdir -p ~/cord
cd ~/cord
git clone "https://gerrit.opencord.org/sdcore-helm-charts"
git clone "https://gerrit.opencord.org/roc-helm-charts"
git clone "https://gerrit.opencord.org/sdfabric-helm-charts"
cd ~/aether-in-a-box
Modify the helm charts as per your need. Also execute helm dep update . in the changed helm chart repo. Example below to add testOpt option in mme.:
node0:~/cord/sdcore-helm-charts$ git diff
diff --git a/omec-control-plane/Chart.yaml b/omec-control-plane/Chart.yaml
index 79c3738..48ae901 100644
--- a/omec-control-plane/Chart.yaml
+++ b/omec-control-plane/Chart.yaml
@@ -9,4 +9,4 @@ description: OMEC control plane services
 name: omec-control-plane
 icon: https://guide.opencord.org/logos/cord.svg

-version: 0.11.1
+version: 0.11.2
diff --git a/omec-control-plane/values.yaml b/omec-control-plane/values.yaml
index 33ac6ce..a6b994a 100644
--- a/omec-control-plane/values.yaml
+++ b/omec-control-plane/values.yaml
@@ -395,6 +395,7 @@ config:
                   - id: frequency
                     type: integer
   mme:
+    testOpt: true
     deploy: true
     podAnnotations:
       fluentbit.io/parser: mme
diff --git a/sdcore-helm-charts/Chart.yaml b/sdcore-helm-charts/Chart.yaml
index 44a5558..151eb07 100644
--- a/sdcore-helm-charts/Chart.yaml
+++ b/sdcore-helm-charts/Chart.yaml
@@ -8,7 +8,7 @@ name: sd-core
 description: SD-Core control plane services
 icon: https://guide.opencord.org/logos/cord.svg
 type: application
-version: 0.11.8
+version: 0.11.9
 home: https://opennetworking.org/sd-core/
 maintainers:
   - name: SD-Core Support
@@ -16,9 +16,9 @@ maintainers:

 dependencies:
   - name: omec-control-plane
-    version: 0.11.1
-    repository: https://charts.aetherproject.org
-    #repository: "file://../omec-control-plane"
+    version: 0.11.2
+    #repository: https://charts.aetherproject.org
+    repository: "file://../omec-control-plane" #refer local helm chart
     condition: omec-control-plane.enable4G

   - name: omec-sub-provision
node0:~/cord/sdcore-helm-charts$

node0:~$ cd cord/sdcore-helm-charts/omec-control-plane/
node0:~/cord/sdcore-helm-charts/omec-control-plane$ helm dependency update .
To install the ROC from the local charts:
make roc-4g-models
To install the 4G SD-CORE from the local charts:
make test
Note
Helm chart changes can not be done when CHARTS option is used. If you need to change helm chart then you should use local helm charts
Troubleshooting 4G Issues
NOTE: Running both 4G and 5G SD-CORE simultaneously in AiaB is currently not supported.
If you suspect a problem, first verify that all pods are in Running state:
kubectl -n omec get pods
kubectl -n aether-roc get pods
4G Test Fails
Occasionally make test (for 4G) fails for unknown reasons; this is true regardless of which Helm charts are used. If this happens, first try recreating the simulated UE / eNB and re-running the test as follows:
make reset-ue
make test
If that does not work, try cleaning up AiaB as described above and re-building it.
If make test fails consistently, check whether the configuration has been pushed to the SD-CORE:
kubectl -n omec logs config4g-0 | grep "Successfully"
You should see that a device group and slice has been pushed:
[INFO][WebUI][CONFIG] Successfully posted message for device group 4g-oaisim-user to main config thread
[INFO][WebUI][CONFIG] Successfully posted message for slice default to main config thread
Then tail the config4g-0 log and make sure that the configuration has been successfully pushed to all SD-CORE components.
Note
For more troubleshooting FAQs, please refer here Troubleshooting guide
Installing the 5G AIAB
Clone 5G AIAB (aether-in-a-box)
To initialize the AiaB environment, first clone the following repository in your home directory:
cd ~
git clone "https://gerrit.opencord.org/aether-in-a-box"
cd ~/aether-in-a-box
Note
Most users install AiaB using published Helm charts (e.g., CHARTS=latest, CHARTS=release-2.0)
If you wish to modify helm charts and want to test AIAB with modified helm charts then check the section Using Local Helm Charts 5G
Installing the ROC for 5G
Note that you must install the ROC before installing SD-CORE. If you are not using the ROC to configure SD-CORE, you can skip this step.
To install the ROC using the latest published charts, add CHARTS=latest to the command, e.g.,:
CHARTS=latest make roc-5g-models #override value file - `~/aether-in-a-box/sd-core-5g-values.yaml`
To install the Aether 2.0 release, add CHARTS=release-2.0:
CHARTS=release-2.0 make roc-5g-models #override value file - `~/aether-in-a-box/release-2.0/sd-core-5g-values.yaml`
The ROC has successfully initialized when you see output like this:
echo "ONOS CLI pod: pod/onos-cli-5b947f8f6-4r5nm"
ONOS CLI pod: pod/onos-cli-5b947f8f6-4r5nm
until kubectl -n aether-roc exec pod/onos-cli-5b947f8f6-4r5nm -- \
    curl -s -f -L -X PATCH "http://aether-roc-api:8181/aether-roc-api" \
    --header 'Content-Type: application/json' \
    --data-raw "$(cat /root/aether-in-a-box//roc-5g-models.json)"; do sleep 5; done
command terminated with exit code 22
command terminated with exit code 22
command terminated with exit code 22
"9513ea10-883d-11ec-84bf-721e388172cd"
Don’t worry if you see a few lines of command terminated with exit code 22; that command is trying to load the ROC models, and the message appears if the ROC isn’t ready yet. However if you see that message more than 10 times then something is probably wrong with the ROC or its models.
Installing the 5G SD-CORE
If you have already installed the 4G SD-CORE, you must skip this step. Only one version of the SD-CORE can be installed at a time.
To deploy the 5G SD-CORE and run a test with gNBSim that performs Registration + UE-initiated PDU Session Establishment + sends User Data packets.
In order to install the SD-CORE using the latest published charts, add CHARTS=latest to the command, e.g.,:
CHARTS=latest make 5g-test
To install the Aether 2.0 release, add CHARTS=release-2.0:
CHARTS=release-2.0 make 5g-test
To change the behavior of the test run by gNBSim, change the contents of gnb.conf in sd-core-5g-values.yaml. Consult the gNBSim documentation for more information.
Exploring 5G AIAB
The kubectl tool is the best way to get familiar with the pods and other Kubernetes objects installed by AiaB. The SD-CORE services, UPF, and simulated edge devices run in the omec namespace, while the ROC is running in the aether-roc namespace.
The ROC GUI is available on port 31194 on the host running AiaB.
See the instructions here to deploy a basic monitoring stack to AiaB. This could be useful if you wish to use AiaB as an environment for prototyping Prometheus exporters or Grafana dashboards for Aether.
Cleanup 5G AIAB
The first time you build AiaB, it takes a while because it sets up the Kubernetes cluster. Subsequent builds will be much faster if you follow these steps to clean up the Helm charts without destroying the Kubernetes cluster.
Clean up the 5G SD-CORE: make reset-5g-test
Clean up the ROC: make roc-clean
It’s normal for the above commands to take a minute or two to complete.
As an example, suppose that you want to test the 4G SD-CORE with the ROC, and then the 5G SD-CORE with the ROC. You could run these commands:
CHARTS=latest make roc-4g-models   # Install ROC with 4G configuration
CHARTS=latest make test            # Install 4G SD-CORE and run ping test
make reset-test
make roc-clean
CHARTS=latest make roc-5g-models   # Install ROC with 5G configuration
CHARTS=latest make 5g-test         # Install 5G SD-CORE and run gNB Sim test
make reset-5g-test
make roc-clean
To completely remove AiaB by tearing down the Kubernetes cluster, run make clean.
Using Custom 5G Container Images
Suppose you wish to test a new build of a 5G SD-CORE services. You can deploy custom images by editing:
Override file - `~/aether-in-a-box/sd-core-5g-values.yaml` if you are using latest or local Helm charts
Override file - `~/aether-in-a-box/release-2.0/sd-core-5g-values.yaml` if you are using release-2.0 charts

#update following content in override values to update image tags
5g-control-plane:
    images:
        tags:
            webui: registry.aetherproject.org/omecproject/5gc-webui:onf-release3.0.5-roc-935305f
        pullPolicy: IfNotPresent
To upgrade a running 5G SD-CORE with the new image, or to deploy the 5G SD-CORE with the image. Use appropriate make commands. Following commands assumes that you are using local helm charts
make reset-5g-test; make 5g-test #if you are not using local charts then use CHARTS option
Note: You can use locally built image (Clone + Compile Code) or you can refer to omecproject dockerhub project to see available image tags.
Using Local Helm Charts 5G
Note: Most users will install AiaB using published Helm charts (e.g., CHARTS=latest, CHARTS=release-2.0). However, if you need to change the Helm charts themselves, clone these additional repositories to work with the local Helm charts:
mkdir -p ~/cord
cd ~/cord
git clone "https://gerrit.opencord.org/sdcore-helm-charts"
git clone "https://gerrit.opencord.org/roc-helm-charts"
git clone "https://gerrit.opencord.org/sdfabric-helm-charts"
cd ~/aether-in-a-box
Modify the helm charts as per your need. Also execute helm dep update . in the changed helm chart repo. Example below to add testOpt option in amf.:
node0:~/cord/sdcore-helm-charts$ git diff
diff --git a/5g-control-plane/Chart.yaml b/5g-control-plane/Chart.yaml
index 421e7e5..3cea334 100644
--- a/5g-control-plane/Chart.yaml
+++ b/5g-control-plane/Chart.yaml
@@ -10,7 +10,7 @@ description: SD-Core 5G control plane services
 name: 5g-control-plane
 icon: https://guide.opencord.org/logos/cord.svg

-version: 0.7.10
+version: 0.7.11

 dependencies:
   - name: mongodb
diff --git a/5g-control-plane/values.yaml b/5g-control-plane/values.yaml
index 8ddcf66..c15d77d 100644
--- a/5g-control-plane/values.yaml
+++ b/5g-control-plane/values.yaml
@@ -417,6 +417,7 @@ config:
           ngapIpList:
             - "0.0.0.0"
   amf:
+    testOpt: true
     deploy: true
     podAnnotations:
       field.cattle.io/workloadMetrics: '[{"path":"/metrics","port":9089,"schema":"HTTP"}]'
diff --git a/sdcore-helm-charts/Chart.yaml b/sdcore-helm-charts/Chart.yaml
index 44a5558..8f52f77 100644
--- a/sdcore-helm-charts/Chart.yaml
+++ b/sdcore-helm-charts/Chart.yaml
@@ -8,7 +8,7 @@ name: sd-core
 description: SD-Core control plane services
 icon: https://guide.opencord.org/logos/cord.svg
 type: application
-version: 0.11.8
+version: 0.11.9
 home: https://opennetworking.org/sd-core/
 maintainers:
   - name: SD-Core Support
@@ -28,9 +28,9 @@ dependencies:
     condition: omec-sub-provision.enable

   - name: 5g-control-plane
-    version: 0.7.8
-    repository: https://charts.aetherproject.org
-    #repository: "file://../5g-control-plane"
+    version: 0.7.11
+    #repository: https://charts.aetherproject.org
+    repository: "file://../5g-control-plane" #enable this line to refer locally changed helm charts
     condition: 5g-control-plane.enable5G

   - name: bess-upf
node0:~/cord/sdcore-helm-charts$

node0:~$ cd cord/sdcore-helm-charts/5g-control-plane/
node0:~/cord/sdcore-helm-charts/5g-control-plane$ helm dependency update .
To install the ROC from the local charts:
make roc-5g-models
To install the 5G SD-CORE from the local charts:
make 5g-test
Note
Helm chart changes can not be done when CHARTS option is used. If you need to change helm chart then you should use local helm charts
Troubleshooting 5G Issues
NOTE: Running both 4G and 5G SD-CORE simultaneously in AiaB is currently not supported.
If you suspect a problem, first verify that all pods are in Running state:
kubectl -n omec get pods
kubectl -n aether-roc get pods
5G Test Fails
If the 5G test fails (make 5g-test) then you will see output like this:
2022-04-21T17:59:12Z [INFO][GNBSIM][Summary] Profile Name: profile2 , Profile Type: pdusessest
2022-04-21T17:59:12Z [INFO][GNBSIM][Summary] Ue's Passed: 2 , Ue's Failed: 3
2022-04-21T17:59:12Z [INFO][GNBSIM][Summary] Profile Errors:
2022-04-21T17:59:12Z [ERRO][GNBSIM][Summary] imsi:imsi-208930100007492, procedure:REGISTRATION-PROCEDURE, error:triggering event:REGESTRATION-REQUEST-EVENT, expected event:AUTHENTICATION-REQUEST-EVENT, received event:REGESTRATION-REJECT-EVENT
2022-04-21T17:59:12Z [ERRO][GNBSIM][Summary] imsi:imsi-208930100007493, procedure:REGISTRATION-PROCEDURE, error:triggering event:REGESTRATION-REQUEST-EVENT, expected event:AUTHENTICATION-REQUEST-EVENT, received event:REGESTRATION-REJECT-EVENT
2022-04-21T17:59:12Z [ERRO][GNBSIM][Summary] imsi:imsi-208930100007494, procedure:REGISTRATION-PROCEDURE, error:triggering event:REGESTRATION-REQUEST-EVENT, expected event:AUTHENTICATION-REQUEST-EVENT, received event:REGESTRATION-REJECT-EVENT
2022-04-21T17:59:12Z [INFO][GNBSIM][Summary] Simulation Result: FAIL
In this case check whether the webui pod has restarted… this can happen if it times out waiting for the database to come up:
$ kubectl -n omec get pod -l app=webui
NAME                     READY   STATUS    RESTARTS        AGE
webui-6b9c957565-zjqls   1/1     Running   1 (6m55s ago)   7m56s
If the output shows any restarts, then restart the simapp pod to cause it to re-push its subscriber state:
$ kubectl -n omec delete pod -l app=simapp
pod "simapp-6c49b87c96-hpf82" deleted
Re-run the 5G test, it should now pass.
Note
For more troubleshooting FAQs, please refer here Troubleshooting guide
Packet Capture
Ksniff is a Kubernetes-integrated packet sniffer shipped as a kubectl plugin. Ksniff uses tcpdump and Wireshark (Wireshark 3.x) to capture traffic on a specific pod within the cluster. After installing Ksniff using Krew and Wireshark, by running the following command you can see the communications between the components. Ksniff uses kubectl to upload the tcpdump binary into the target container (e.g. mme, amf, upf, …), and redirects the output to Wireshark:
kubectl sniff -n omec mme-0
Note: To collect packets using Wireshark, the (virtual) machine where Ksniff/Wireshark is running needs to have a Desktop environment installed for Wireshark to run. Also, note that the desktop machine running Ksniff/Wireshark doesn’t need to be the same machine as the one running AiaB.
You can see the packets sent/received between the core components from the moment an UE initiates the attach procedure through eNB until the dedicated bearer (uplink and downlink) has been established (see figure below). After the bearer has been established, traffic sent from UE’s interface (oip1) will go through the eNB and UPF.

Figure 2. Wireshark output of ksniff on mme pod
Using Ksniff on the router pod you can see all the packets exchanged between the UE and external hosts (e.g. ping an external host from the UE interface):
kubectl sniff -n default router

Figure 3. Data Flow from UE to an external host through the User Plane (filtered on UE’s IP address)
Looking at the packet’s details, the first and second packets are from enb to router and then to upf in a GTP tunnel. And the third packet is sent from router to the external network via NAT. The rest are the reply packets from the external host to the UE.
By default, Ksniff runs tcpdump on all interfaces (i.e. -i any). To retrieve more details of packets (e.g. ethernet header information) on a specific interface, you can explicitly specify the interface along with options (e.g. -e). e.g.:
kubectl sniff -n default router -i access-gw -f "-e"