Aether ROC Developer Guide
Background / Development Environment
This document assumes familiarity with Kubernetes and Helm, and that a Kubernetes/Helm development environment has already been deployed in the developer’s work environment.
This development environment can use any of a number of potential mechanisms – including KinD, kubeadm, etc.
The Aether-in-a-Box script is one potential way to setup a development environment, but not the only way. As an alternative to the developer’s local machine, a remote environment can be set up, for example on cloud infrastructure such as Cloudlab.
Note
When ROC is deployed it is unsecured by default, with no Authentication or Authorization. To secure ROC so that the Authentication and Authorization can be tested, follow the Securing ROC guide below Securing ROC
Installing Prerequisites
Atomix and onos-operator must be installed:
# create necessary namespaces
kubectl create namespace micro-onos

# add repos
helm repo add atomix https://charts.atomix.io
helm repo add onosproject https://charts.onosproject.org
helm repo update

# install atomix
export ATOMIX_CONTROLLER_VERSION=0.6.8
helm -n kube-system install atomix-controller atomix/atomix-controller --version $ATOMIX_CONTROLLER_VERSION
export ATOMIX_RAFT_VERSION=0.1.9
helm -n kube-system install atomix-raft-storage atomix/atomix-raft-storage --version $ATOMIX_RAFT_VERSION

# install the onos operator
ONOS_OPERATOR_VERSION=0.4.10
helm install -n kube-system onos-operator onosproject/onos-operator --version $ONOS_OPERATOR_VERSION
Note
The ROC is sensitive to the versions of Atomix and onos-operator installed. The values shown above are correct for the 1.3.x versions of the aether-roc-umbrella.
ROC Version |
Atomix Controller |
Atomix Raft |
Onos Operator |
|---|---|---|---|
1.2.25-1.2.45 |
0.6.7 |
0.1.8 |
0.4.8 |
1.3.0- |
0.6.8 |
0.1.9 |
0.4.10 |
Verify that these services were installed properly. You should see pods for atomix-controller, atomix-raft-storage-controller, onos-operator-config, and onos-operator-topo. Execute these commands:
helm -n kube-system list
kubectl -n kube-system get pods | grep -i atomix
kubectl -n kube-system get pods | grep -i onos
Create a values-override.yaml
You’ll want to override several of the defaults in the ROC helm charts:
cat > values-override.yaml <<EOF
import:
  onos-gui:
    enabled: true

onos-gui:
  ingress:
    enabled: false

aether-roc-gui-v3:
  ingress:
    enabled: false
EOF
Installing the aether-roc-umbrella Helm chart
Add the necessary helm repositories:
# obtain username and password from Michelle and/or ONF infra team
export repo_user=<username>
export repo_password=<password>
helm repo add aether --username "$repo_user" --password "$repo_password" https://charts.aetherproject.org
aether-roc-umbrella will bring up the ROC and its services:
helm -n micro-onos install aether-roc-umbrella aether/aether-roc-umbrella -f values-override.yaml

kubectl wait pod -n micro-onos --for=condition=Ready -l type=config --timeout=300s
Posting the mega-patch
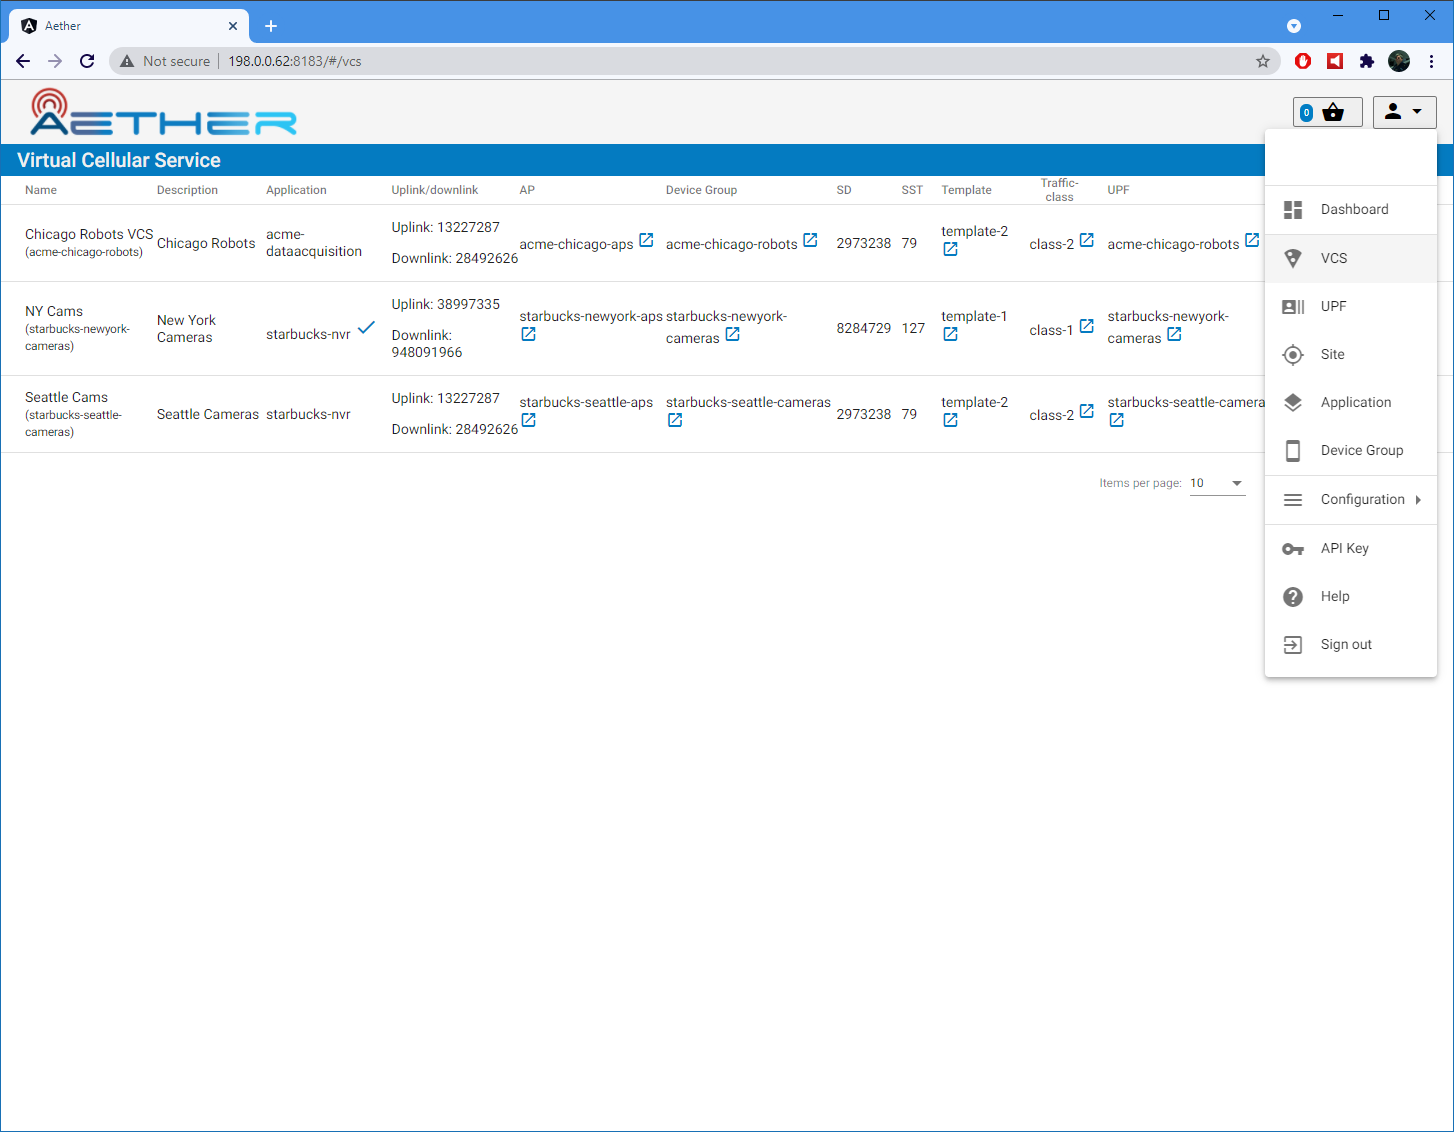
The ROC usually comes up in a blank state – there are no Enterprises, UEs, or other artifacts present in it. The mega-patch is an example patch that populates the ROC with some sample enterprises, UEs, slices, etc. Execute the following:
# launch a port-forward for the API
# this will continue to run in the background
kubectl -n micro-onos port-forward service/aether-roc-api   --address 0.0.0.0 8181:8181 &

git clone https://github.com/onosproject/aether-roc-api.git

# execute the mega-patch (it will post via CURL to localhost:8181)
bash ~/path/to/aether-roc-api/examples/MEGA_Patch.curl
You may wish to customize the mega patch.
For example, by default the patch configures the sdcore-adapter to push to
sdcore-test-dummy.
You could configure it to push to a live aether-in-a-box core by doing something like this:
sed -i 's^http://aether-roc-umbrella-sdcore-test-dummy/v1/config/5g^http://webui.omec.svc.cluster.local:9089/config^g' MEGA_Patch.curl

#apply the patch
./MEGA_Patch.curl
(Note that if your Aether-in-a-Box was installed on a different machine that port-forwarding may be necessary)
Expected CURL output from a successful mega-patch post will be a UUID.
You can also verify that the mega-patch was successful by going into the
aether-roc-gui in a browser (see the section on useful port-forwards
below). The GUI may open to a dashboard that is unpopulated – you can use the
dropdown menu (upper-right hand corner of the screen) to select an object such
as VCS and you will see a list of VCS.
Uninstalling the aether-roc-umbrella Helm chart
To tear things back down, usually as part of a developer loop prior to redeploying again, do the following:
helm -n micro-onos del aether-roc-umbrella
If the uninstall hangs or if a subsequent reinstall hangs, it could be an issue with some of the CRDs not getting cleaned up. The following may be useful:
# fix stuck finalizers in operator CRDs

kubectl -n micro-onos patch entities connectivity-service-v2 --type json --patch='[ { "op": "remove", "path": "/metadata/finalizers" } ]'

kubectl -n micro-onos patch entities connectivity-service-v3 --type json --patch='[ { "op": "remove", "path": "/metadata/finalizers" } ]'

kubectl -n micro-onos patch kind aether --type json --patch='[ { "op": "remove", "path": "/metadata/finalizers" } ]'
Useful port forwards
Port forwarding is often necessary to allow access to ports inside of Kubernetes pods that use ClusterIP addressing. Note that you typically need to leave a port-forward running (you can put it in the background). Also, If you redeploy the ROC and/or if a pod crashes then you might have to restart a port-forward. The following port-forwards may be useful:
# aether-roc-api

kubectl -n micro-onos port-forward service/aether-roc-api --address 0.0.0.0 8181:8181

# aether-roc-gui

kubectl -n micro-onos port-forward service/aether-roc-gui --address 0.0.0.0 8183:80

# grafana

kubectl -n micro-onos port-forward service/aether-roc-umbrella-grafana --address 0.0.0.0 8187:80

# onos gui

kubectl -n micro-onos port-forward service/onos-gui --address 0.0.0.0 8182:80
aether-roc-api and aether-roc-gui are in our experience the most useful two port-forwards.
aether-roc-api is useful to be able to POST REST API requests.
aether-roc-gui is useful to be able to interactively browse the current configuration.
Note
Internally the aether-roc-gui operates a Reverse Proxy on the aether-roc-api. This
means that if you have done a port-forward to aether-roc-gui say on port 8183 there’s no
need to do another on the aether-roc-api instead you can access the API on
http://localhost:8183/aether-roc-api
Deploying using custom images
Custom images may be used by editing the values-override.yaml file.
For example, to deploy a custom sdcore-adapter:
sdcore-adapter-v3:

prometheusEnabled: false

image:

repository: my-private-repo/sdcore-adapter

tag: my-tag

pullPolicy: Always
The above example assumes you have published a docker images at my-private-repo/sdcore-adapter:my-tag.
My particular workflow is to deploy a local-docker registry and push my images to that.
Please do not publish ONF images to a public repository unless the image is intended to be public.
Several ONF repositories are private, and therefore their docker artifacts should also be private.
There are alternatives to using a private docker repository. For example, if you are using kubeadm, then you may be able to simply tag the image locally. If you’re using KinD, then you can push a local image to into the kind cluster:
kind load docker-image sdcore-adapter:my-tag
Developing using a custom onos-config
The onos-operator is responsible for building model plugins at runtime. To do this, it needs source code for onos-config that matches the onos-config image that is deployed. One way to do this is to fork the onos-config repository and commit your onos-config changes to a personal repository, and then reference that personal repository in the values.yaml. For example:
onos-config:
  plugin:
    compiler:
      target: "github.com/mygithubaccount/onos-config@mytag"
  image:
    repository: mydockeraccount/onos-config
    tag: mytag
    pullPolicy: Always
In the above example, the operator will pull the image from mydockeraccount, and it’ll pull the onos-config code from mygithubaccount. Using a personal docker account is not strictly necessary; images can also be built and tagged entirely locally.
Inspecting logs
Most of the relevant Kubernetes pods are in the micro-onos namespace. The names may change from deployment to deployment, so start by getting a list of pods:
kubectl -n micro-onos get pods
Then you can inspect a specific pod/container:
kubectl -n micro-onos logs sdcore-adapter-v3-7468cc58dc-ktctz sdcore-adapter-v3
Securing ROC
When deploying ROC with the aether-roc-umbrella chart, secure mode can be enabled by
specifying an OpenID Connect (OIDC) issuer like:
helm -n micro-onos install aether-roc-umbrella aether/aether-roc-umbrella \
    --set onos-config.openidc.issuer=http://k3u-keycloak:80/auth/realms/master \
    --set aether-roc-gui-v3.openidc.issuer=http://k3u-keycloak:5557/auth/realms/master
The choice of OIDC issuer in this case is keycloak-389-umbrella, or alternately dex-ldap-umbrella (deprecated).
keycloak-389-umbrella
Keycloak is an Open Source Identity and Access Management for Modern Applications and Services. It can be used as an OIDC Issuer than can act as a front end to several authentication systems e.g. LDAP, Crowd, Google, GitHub
keycloak-389-umbrella is a Helm chart that combines a Keycloak server with an LDAP
installation (389 Directory Server), and an LDAP administration tool. It can be deployed in to the
same cluster namespace as aether-roc-umbrella.
Its LDAP server is populated with 7 different users in the 2 example enterprises - starbucks and acme.
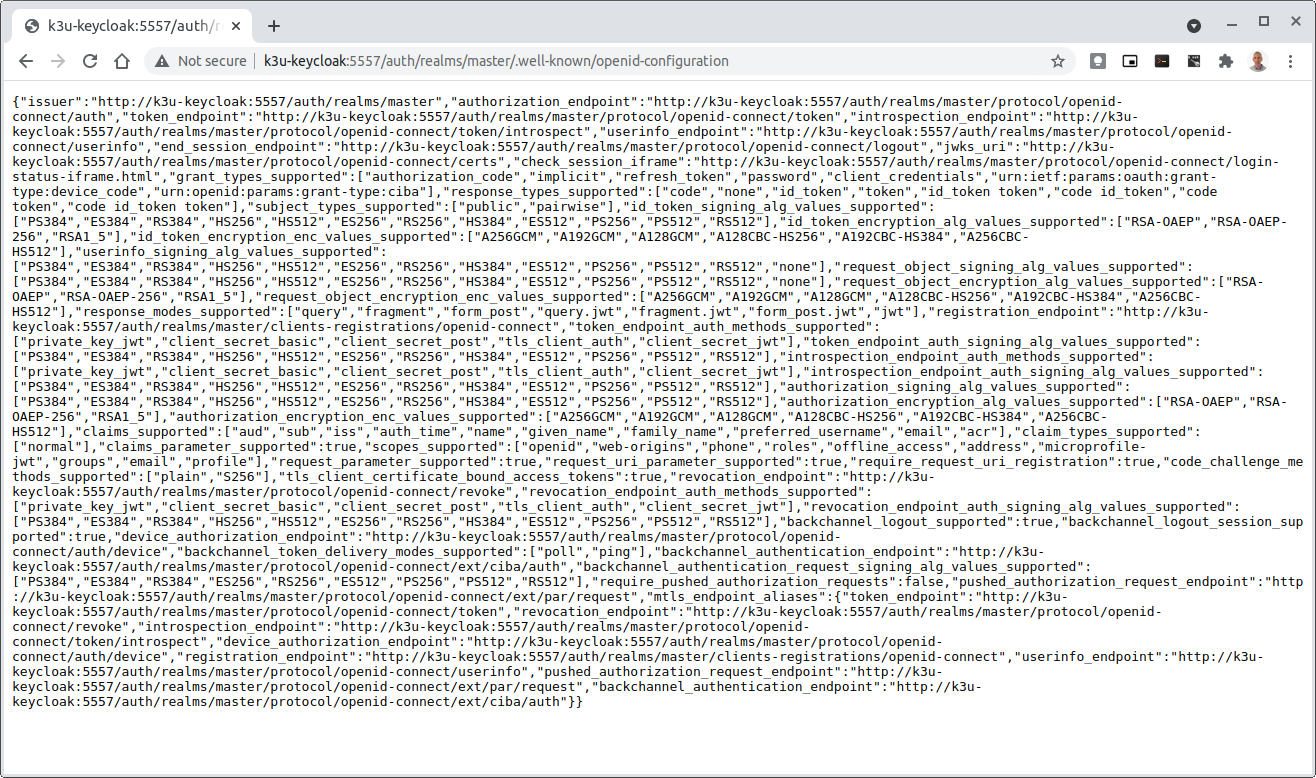
When running it should be available at http://k3u-keycloak:5557/auth/realms/master/.well-known/openid-configuration.
See keycloak-389-umbrella for more details.
In a production environment, the public Aether Keycloak (with its LDAP server populated with Aether users and groups) should be used. See public keycloak for more details.
Note
Your RBAC access to ROC will be limited by the groups you belong to in its LDAP store.
dex-ldap-umbrella (Deprecated)
Dex is a cloud native OIDC Issuer than can act as a front end to several authentication systems e.g. LDAP, Crowd, Google, GitHub
dex-ldap-umbrella is a Helm chart that combines a Dex server with an OpenLDAP
installation, and an LDAP administration tool. It can be deployed in to the
same cluster namespace as aether-roc-umbrella.
Its LDAP server is populated with 7 different users in the 2 example enterprises - starbucks and acme.
When running it should be available at http://dex-ldap-umbrella:5556/.well-known/openid-configuration.
See dex-ldap-umbrella for more details.
As an alternative there is a public Dex server connected to the ONF Crowd server, that allows ONF staff to login with their own credentials: See public dex for more details.
Note
Your RBAC access to ROC will be limited by the groups you belong to in Crowd.
Role Based Access Control
When secured, access to the configuration in ROC is limited by the groups that a user belongs to.
AetherROCAdmin - users in this group have full read and write access to all configuration.
<enterprise> - users in a group the lowercase name of an enterprise, will have read access to that enterprise.
EnterpriseAdmin - users in this group will have read and write access the enterprise they belong to.
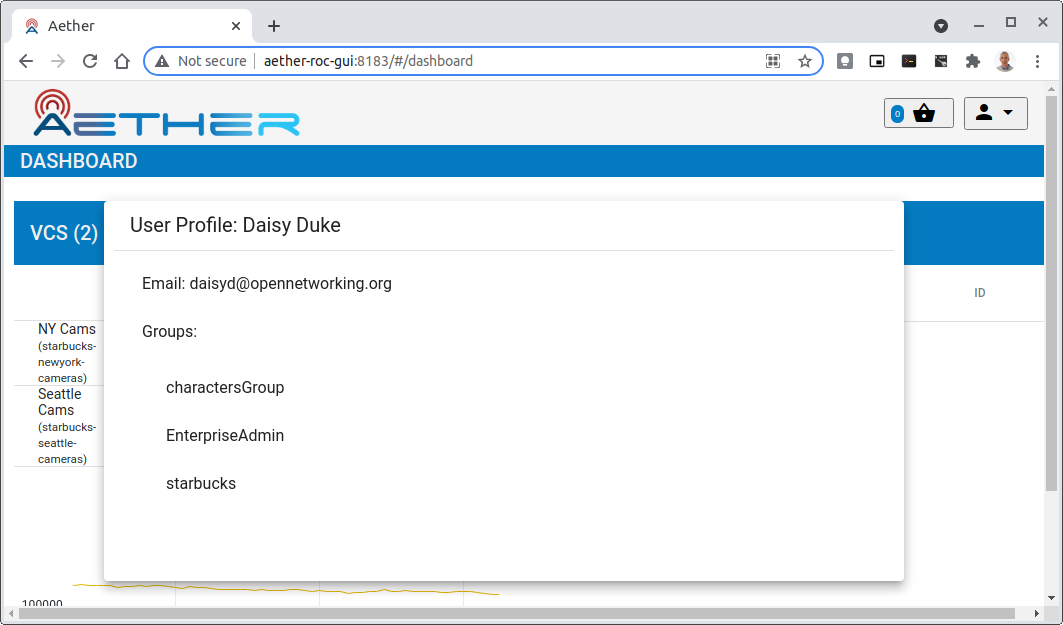
For example in keycloak-389-umbrella the user Daisy Duke belongs to starbucks and EnterpriseAdmin and so has read and write access to items linked with starbucks enterprise.
By comparison the user Elmer Fudd belongs only to starbucks group and so has only read access to items linked with the starbucks enterprise.
Requests to a Secure System
When configuration is retrieved or updated through aether-config, a Bearer Token in the form of a JSON Web Token (JWT) issued by the selected OIDC Issuer server must accompany the request as an Authorization Header.
This applies to both the REST interface of aether-roc-api and the gnmi interface of
aether-rconfig.
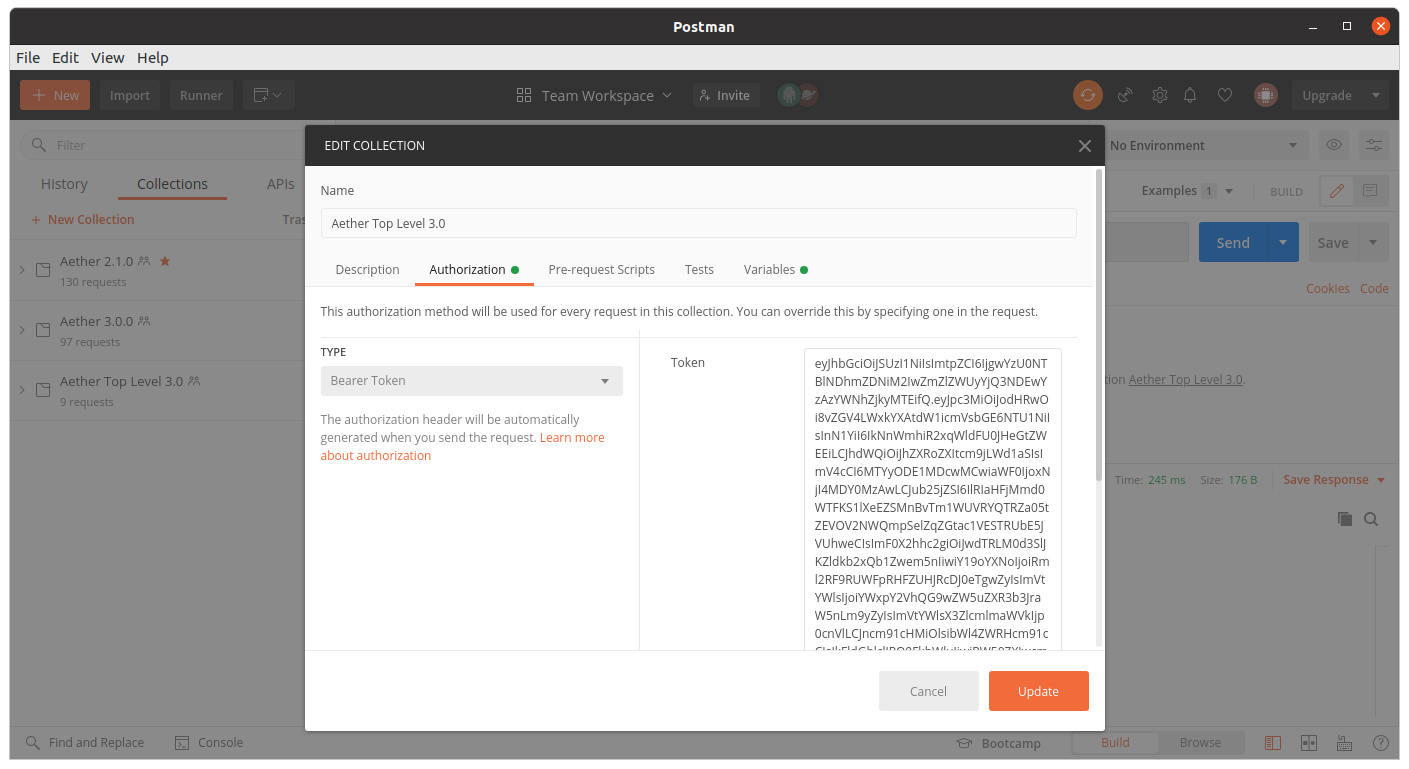
In the Aether ROC, a Bearer Token can be generated by logging in and selecting API Key from the menu. This pops up a window with a copy button, where the key can be copied.
The key will expire after 24 hours.

Accessing the REST interface from a tool like Postman, should include this Auth token.
Logging
The logs of aether-config will contain the username and timestamp of any gnmi call when security is enabled.

Accessing GUI from an external system
To access the ROC GUI from a computer outside the Cluster machine using port-forwarding then it is necessary to:
Ensure that all port-forward’s have –address=0.0.0.0
Add to the IP address of the cluster machine to the /etc/hosts of the outside computer as:
<ip address of cluster> k3u-keycloak aether-roc-gui
Verify that you can access the Keycloak server by its name http://k3u-keycloak:5557/auth/realms/master/.well-known/openid-configuration
Access the GUI through the hostname (rather than ip address)
http://aether-roc-gui:8183
Troubleshooting Secure Access
While every effort has been made to ensure that securing Aether is simple and effective, some difficulties may arise.
One of the most important steps is to validate that the OIDC Issuer (Keycloak server) can be reached from the browser. The well_known URL should be available and show the important endpoints are correct.
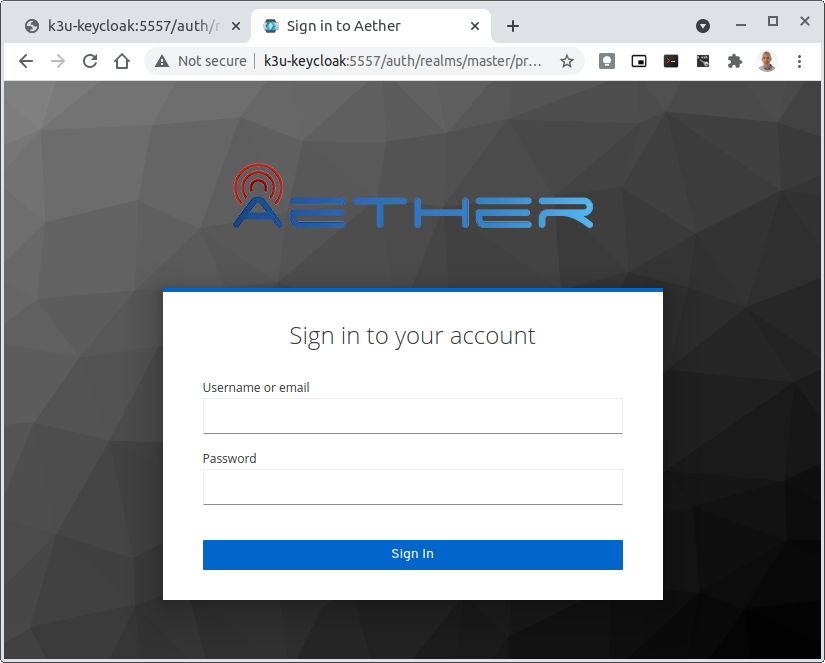
If logged out of the Browser when accessing the Aether ROC GUI, accessing any page of the application should redirect to the Keycloak login page.
When logged in the User details can be seen by clicking the User’s name in the drop down menu. This shows the groups that the user belongs to, and can be used to debug RBAC issues.
When you sign out of the ROC GUI, if you are not redirected to the Keycloak Login Page, you should check the Developer Console of the browser. The console should show the correct OIDC issuer (Keycloak server), and that Auth is enabled.

ROC Data Model Conventions and Requirements
The MEGA-Patch described above will bring up a fully compliant sample data model. However, it may be useful to bring up your own data model, customized to a different site of sites. This subsection documents conventions and requirements for the Aether modeling within the ROC.
The ROC models must be configured with the following:
A default enterprise with the id defaultent.
A default ip-domain with the id defaultent-defaultip.
A default site with the id defaultent-defaultsite. This site should be linked to the defaultent enterprise.
A default device group with the id defaultent-defaultsite-default. This device group should be linked to the defaultent-defaultip ip-domain and the defaultent-defaultsite site.
Each Enterprise Site must be configured with a default device group and that default device group’s name must end in the suffix -default. For example, acme-chicago-default.
Some exercises to get familiar
Deploy the ROC and POST the mega-patch, go into the
aether-roc-guiand click through the VCS, DeviceGroup, and other objects to see that they were created as expected.Examine the log of the
sdcore-adapter-v3container. It should be attempting to push the mega-patch’s changes. If you don’t have a core available, it may be failing the push, but you should see the attempts.Change an object in the GUI. Watch the
sdcore-adapter-v3log file and see that the adapter attempts to push the change.Try POSTing a change via the API. Observe the
sdcore-adapter-v3log file and see that the adapter attempts to push the change.Deploy a 5G Aether-in-a-Box (See Setting Up Aether-in-a-Box), modify the mega-patch to specify the URL for the Aether-in-a-Box
webuicontainer, POST the mega-patch, and observe that the changes were correctly pushed via thesdcore-adapter-v3into thesd-core’swebuicontainer (webuicontainer log will show configuration as it is received)